The Unofficial Samba HOWTO
By David Lechnyr
lechnyr.com/unofficial-samba/
September 28, 2013
Once long ago, there was a fancy buzzword with a complex history commonly referred to as DCE/RPC. This stood for Distributed Computing Environment/Remote Procedure Calls and conceptually was a good idea. Commissioned as a conceptual project by the Open Software Foundation, the goal was that programmers would be able to write software that would run across multiple computers without the need to worry about all the messy underlying network code to make it work. When there was a need to run it over TCP so that it would be compatible with Digital Equipment Corporation’s suite of network protocols, it was redesigned, re-submitted and officially became known as DCE/RPC.
Microsoft came along and decided, rather than pay $20 per seat to license this new technology, to re-implement and rebrand DCE/RPC as MS-RPC (Microsoft Remote Procedure Call). From this, the concept continued in the form of SMB (Server Message Block, or the "what") using the NetBIOS (Network Basic Input/Output System, or the "how") compatibility layer. If you’re feeling dizzy with terminology right about now, you’re not alone; DCE/RPC and its assorted companions have a long and convoluted history. Perhaps the best summary of the origins of SMB/CIFS are voiced in the 1997 article by Avian Research, CIFS: Common Insecurities Fail Scrutiny:
With all things being what they were, Microsoft kept their implementation of SMB/CIFS (mostly) secret. If you didn’t have a Windows machine, you were out of luck sharing files or printers with other Windows machines. Thus, the need for Samba — a way to mix Windows and Linux machines together without requiring a separate Windows server — was born.
Installing Samba
"All parts should go together without forcing. You must remember that the parts you are reassembling were disassembled by you. Therefore, if you can't get them together again, there must be a reason. By all means, do not use hammer."
IBM maintenance manual
The main reason to install Samba yourself is to answer some of the questions that you’ll probably run up against: What configuration options were used during its build that might affect its behavior? Where will it look for its configuration files? Have any modifications to the source code been made by your particular Linux vendor? You get the idea.
First, we need to download the latest Samba source archive:
$ curl -LO http://samba.org/samba/ftp/stable/samba-x.y.z.tar.gz
Verify
In most cases, you would verify the source archive against the GPG signed key. However, in the case of Samba, things are a little different. This is, essentially, my fault. The Samba team used to provide both gzip and bzip2 versions of their software, each with their own unique GPG signed key. In an insane moment long ago, I mentioned that it would be less complicated to make a single GPG signed file of the tarball only, not the subsequent gzip or bzip2 versions. Unfortunately, they took my advice on this bit, and now things are now less standardized than before. Regardless:
$ gunzip samba-x.y.z.tar.gz
$ curl -LO http://samba.org/samba/ftp/stable/samba-x.y.z.tar.asc
$ gpg –keyserver-options auto-key-retrieve –verify samba-x.y.z.tar.asc
Uncompress
Next, you will need to uncompress the Samba source archive and enter into the source directory:
$ tar –no-same-owner –no-same-permissions -xvf samba-x.y.z.tar
$ cd samba-x.y.z/source
It’s worth noting that the Samba source includes the following useful files and directories:
WHATSNEW.txt– Changes since the last version. Of all the documents, this is probably the most important one to be aware of.docs/– Samba documentation, both old and newexamples/– Sample configuration files for Sambasource/– The actual Samba source code itself
Also, you’ll kick yourself if you haven’t yet realized that the full, unabridged version of Using Samba by O’Reilly is included in the source tarball for free. It’s located in docs/htmldocs/using_samba/
If you’re in a hurry and just want to get it over with, you can simply issue the command:
$ ./configure
A more slightly elaborate configuration might entail:
$ ./configure \
	–prefix=/usr/local/samba-x.y.z \
	–with-configdir=/etc/samba \
	–with-privatedir=/etc/samba/private \
	–disable-cups \
	–with-cifsmount
$ make
# make install
Note: many possible configuration options require a healthy dose of common sense. For example, using –enable-cups=yes would create quite the quandary if you don’t have CUPS installed on your system.
While most Linux distros will already have these instances defined, you’ll want to verify that your system’s /etc/services file includes the following definitions for the ports that Samba will use. Don’t be suprised if you see unexpected entries for “137/tcp” and so forth; IANA typically includes both tcp and udp entries regardless of whether or not the protocol requires it.
netbios-ns	137/udp		# NETBIOS Name Service
netbios-dgm	138/udp		# NETBIOS Datagram Service
netbios-ssn	139/tcp		# NETBIOS Session Service
microsoft-ds	445/tcp		# Microsoft-DS
To start Samba, simply run both daemons either by hand or in a startup script:
# /usr/local/samba-x.y.z/sbin/smbd -D
# /usr/local/samba-x.y.z/sbin/nmbd -D
To stop Samba, it’s recommended that SIGKILL (-9) not be used, except as a last resort. According to the Samba documentation, “this may leave the shared memory area in an inconsistent state”. So, instead we’ll use:
# killall -15 smbd nmbd
If you really just want to restart Samba (thus having it re-read its configuration files), you can just send a SIGHUP signal:
# killall -HUP smbd nmbd
If you really want to get fancy (which is not always a good idea though), you could create a startup/stop script with something like:
#!/bin/sh
# chkconfig: 2345 91 35
# description: Initialization script for Samba

# Make sure the configuration file exists
[ -f /etc/samba/smb.conf ] || exit 1

samba_start() {
	echo "Starting SMB services"
	/usr/local/samba/sbin/smbd -D
	echo "Starting NMB services"
	/usr/local/samba/sbin/nmbd -D
}

samba_stop() {
	echo -n "Stopping smbd"

	kill -15 $(</usr/local/samba/var/locks/smbd.pid)
	while [[ -f /usr/local/samba/var/locks/smbd.pid ]]; do echo -n .; sleep 1; done ; echo
	echo -n "Stopping nmbd"
	kill -15 $(</usr/local/samba/var/locks/nmbd.pid)
	while [[ -f /usr/local/samba/var/locks/nmbd.pid ]]; do echo -n .; sleep 1; done ; echo
}

samba_reload() {
	echo "Re-reading Samba configuration files"
	kill -HUP $(</usr/local/samba/var/locks/nmbd.pid)
}

# See how we were called
case "$1" in
	'start')
		samba_start
		;;
	'stop')
		samba_stop
		;;
	'restart')
		samba_stop
		sleep 1
		samba_start
		;;
	'reload')
		samba_reload
		;;
	*)
		echo "Usage: $0 {start|stop|restart|reload}"

		;;
esac
Configuring Samba
Configuring Samba is fairly straightfoward, however it is akin to reading an instruction book written in a different language. Hopefully, this next bit will get you up and running fast, albeit with minimal security (read: none). It’s perfect for a quick & dirty method to transfer files to and from your Samba box via the Windows interface if you’re none too concerned about additional computers on your network (e.g., a home network).By default, Samba does not install any configuration file whatsoever. So, the very first thing we’ll need to do is fire up our favorite text editor (vim, pico, etc.) and create the file /etc/samba/smb.conf with the following contents. Don’t worry about the meaning of each of these just yet.
Setting the Stage
To make things easier, going to assume some basic settings for our imaginary server throughout the remainder of this document:
- Server IP Address: 192.168.1.1
- Server URI: fluffygerbil.example.com
Of course, none of this will work if we don’t ensure basic connectivity first. From a workstation in the same subnet, run the following commands (in this example, we’re using the Terminal app in Mac OS X):
$ ping 192.168.1.1

PING 192.168.1.1 (192.168.1.1): 56 data bytes
64 bytes from 192.168.1.1: icmp_seq=0 ttl=64 time=2.010 ms
64 bytes from 192.168.1.1: icmp_seq=1 ttl=64 time=2.329 ms
64 bytes from 192.168.1.1: icmp_seq=2 ttl=64 time=2.296 ms
64 bytes from 192.168.1.1: icmp_seq=3 ttl=64 time=2.950 ms
^C
--- 192.168.1.1 ping statistics ---
4 packets transmitted, 4 packets received, 0% packet loss

$ ping fluffygerbil.example.com

PING fluffygerbil.example.com (192.168.1.1): 56 data bytes
64 bytes from 192.168.1.1: icmp_seq=0 ttl=64 time=2.010 ms
64 bytes from 192.168.1.1: icmp_seq=1 ttl=64 time=2.329 ms
64 bytes from 192.168.1.1: icmp_seq=2 ttl=64 time=2.296 ms
64 bytes from 192.168.1.1: icmp_seq=3 ttl=64 time=2.950 ms
^C
--- fluffygerbil.example.com ping statistics ---
4 packets transmitted, 4 packets received, 0% packet loss
If either of these two commands don’t work, then you’ve got bigger issues on your hands (the former being network connectivity; the latter DNS issues).
Our sample configuration we’ll use throughout the remainder of this document is:
[global]
	guest account = smbguest
	netbios name = FLUFFYGERBIL
	security = share
	socket options = TCP_NODELAY IPTOS_LOWDELAY
	workgroup = WORKGROUP

[public]
	guest ok = yes
	guest only = yes
	path = /cifs/pub
	read only = no

[cdrom]
	fake oplocks = yes
	guest ok = yes
	guest only = yes
	path = /mnt/cdrom
	read only = yes
Next, we’ll need to set up a generic guest account in the system itself. While the commands can be somewhat system dependent, you can typically do this with something similar to:
# groupadd smbguest
# useradd -g smbguest -d /dev/null -s /bin/false smbguest
Connecting to Samba
To connect to our shiny new Samba server, we’re going to work with a fictitious setup involving a Samba server and two clients: A Windows computer and a Linux workstation.
Microsoft Windows
All initial tests should be done via the command line. Otherwise, if something doesn’t work quite the way you expect it to, there are a lot less layers of technology to diagnose between you and the command you want to implement. From a command prompt, type the following:
C:\> net view \\192.168.1.1
Shared resources at \\192.168.1.1
Share name Type Used as Comment
———————————————————–
pub 		Disk
private	Disk
The command completed successfully.

C:\> net use j: \\192.168.1.1\pub

The command completed successfully.
At this point, you could easily open up the My Computer icon and, from the toolbar at the top, select Tools then Map Network Drive. From the new window popup, you can then fill out the necessary information:
Linux
If you plan to use your Linux machine as a client and connect to remote Windows shares instead, you’ll need to have support compiled into your kernel. CIFS support is available only in Linux 2.6, whereas both support the more venerable SMB_FS.
You’ll also need to install Samba on this Linux box, even though you won’t be running it as a server. Make sure to compile it using the --with-smbmount parameter (to access older Windows-based shares) and the --with-cifsmount parameter. Essentially, this just creates the mount.cifs and umount.cifs binaries, which you’ll need.
If you’re running Linux 2.4 or 2.6 on another machine, you could type the following to connect to your Samba server (respectively):
# mount -t smbfs -o username=smbguest //192.168.1.1/pub /mnt
# mount -t cifs -o user=smbguest //192.168.1.1/pub /mnt
Regardless, if you don’t have SMB support compiled into your kernel on the machine you’re connecting from, neither of these commands will work:
# mount -t cifs -o user=smbguest //192.168.1.1/pub /mnt
mount: fs type cifs not supported by kernel

# mount -t smbfs -o username=smbguest //192.168.1.1/pub /mnt
mount: fs type smbfs not supported by kernel
Samba as a Primary Domain Controller
If you’re interested in running Samba as a Primary Domain Controller, you’ll need to make a few changes on the Server first. We’ll assume that you’re running Samba with the following configuration file:
[global]
	domain logons = yes
	domain master = Yes
	netbios name = fluffygerbil
	os level = 255
	preferred master = yes
	security = user
	wins support = yes
	workgroup = fluffygroup

[homes]
	valid users = %S
	read only = no
	browseable = no
	create mode = 0600
	directory mode = 0700
After restarting the Samba daemons, you’ll need to create a Samba password file if you haven’t yet:
# umask 077
# mkdir -p /etc/samba/private
# touch /etc/samba/private/smbpasswd
Now, you can add some accounts to it. Let’s assume that we’re going to add a user account named fred and a workstation named FLUFFBOX. On the Samba server, you’ll need to add the following accounts to the system:
# groupadd smbuser
# useradd -d /home/fred -g smbuser -s /bin/false -m fred
# smbpasswd -a fred
# smbpasswd -a root
# groupadd workstation
# useradd -d /dev/null -g workstation -s /bin/false fluffbox$
# smbpasswd -a -m fluffbox
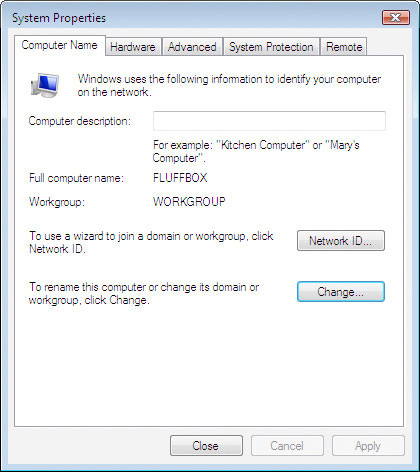
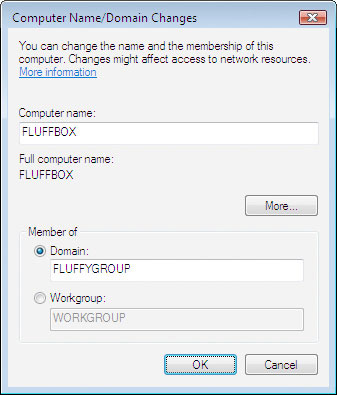
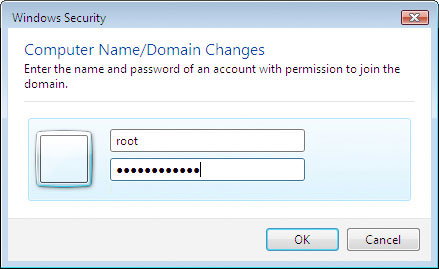
Now, you should be able to add the workstation to the Samba domain. Remember, when prompted for an account that has authorization to join the new domain, use the root user with the Samba password you have assigned it (not the normal root password!):
A Caution Regarding Linefeeds
Another issue to become aware of with login scripts is linefeeds. If you’re working in a Linux/Windows mixed environment, you’re bound to come across files that are littered with ‘^M’ at the end of every line. This is the Windows command for ‘newline’, which uses a combination of CR/LF, whereas Linux uses just the single LF. To convert a text file from DOS to Linux, thereby removing the ‘^M’ newline characters in the file, use the fromdos command:
fromdos <dosfile >linuxfile
To convert a text file from Linux to DOS, thus adding the ‘^M’ newline characters so that the file can be read by your Windows clients, use todos:
todos <linuxfile >dosfile
Alternately, if you find you don’t have the fromdos/todos utilities, you can try this simple trick:
cat dosfile | col -b > linuxfile
It’s worth noting that if you’re running into this problem in the first place, it means you’re working on a file that is being edited in both your Linux and Windows environments. As such, you should probably read the section on Oplocks to prevent any data loss…
If you’d rather take care of things from the Windows side of the coin, you can simply use a text editor that can convert between DOS/Linux. For Windows, you can try Editeur. For Macintosh, try BBEdit or TextMate.
Roaming Profiles
Roaming profiles are, perhaps, the bane of being a network administrator. They can potentially cause more problems than they solve, slow down the login process to a crawl, are difficult to diagnose and, generally speaking, are frowned upon by seasoned network administrators. Having said this, they’re a feature that is high in demand among both users and upper-management staff and are, therefore, here to stay.A roaming profile essentially allows users to have their documents, desktop layout and settings follow them as they log in from one computer to another. Roaming profiles are stored on a central server in a domain. When logging in, Windows copies the user’s profile from the server to the local computer. When the user logs off, Windows copies the changed user profile data back to the server for storage.
Unfortunately, this both solves and creates additional problems. As user profiles increase in size, they can begin to be as large as 20, 50, 100, 1,000 megabytes or even more. This increase in size causes delays in logging in, as it takes time for the user’s profile to be copied from the server to the local computer, and back again at logoff. Additionally, when the user logs in to multiple computers at the same time, the last computer to log out “wins” as far as what the default settings should be.
Sounds like fun, right? Let’s begin.
Adjust your configuration file on the Samba server to include the following:
[global]
	domain logons = yes
	domain master = Yes
	logon drive = P:
	logon home = \\%L\%U
	logon path = \\%L\profile\%U
	netbios name = fluffygerbil
	os level = 255
	preferred master = yes
	security = user
	wins support = yes
	workgroup = fluffygroup

[profile]
	path = /cifs/profile
	read only = no
	profile acls = yes
	create mode = 0600
	directory mode = 0700
	browseable = no
You’ll also need to make sure that the necessary directories exist with the appropriate permissions:
# mkdir -p /cifs/profile
# chmod 1755 /cifs/profile
Simply restart the Samba server, and you should be good to go.
If you run into problems, you have one of two available options using the Group Policy (gpedit.msc) console on each Windows client:
1. Enable the Do not check for user ownership of Roaming Profile Folders setting and reboot. From the Windows description of this option: “For Windows 2000 Professional pre-SP4 and Windows XP pre-SP1 operating systems, the default file permissions for the newly generated profile are full control access for the user and no file access for the administrators group. No checks are made for the correct permissions if the profile folder already exists. For Windows Server 2003 family, Windows 2000 Professional SP4 and Windows XP SP1, the default behavior is to check the folder for the correct permissions if the profile folder already exists, and not copy files to or from the roaming folder if the permissions are not correct. By configuring this setting, you can alter this behavior. If you enable this setting Windows will not check the permissions for the folder in the case where the folder exists. If you disable or do not configure this setting AND the roaming profile folder exists AND the user or administrators group not the owner of the folder, Windows will NOT copy files to or from the roaming folder. The user will be shown an error message and an entry will be written to the event log. The user’s cached profile will be used, or a temporary profile issued if no cached profile exists. Note: The setting must be configured on the client computer not the server for it to have any effect because the client computer sets the file share permissions for the roaming profile at creation time. Note: The behavior when this setting is enabled is exactly the same behavior as in Windows 2000 Professional pre-SP4 and Windows XP Professional.”
- or -
2. Enable the Only allow local user profiles setting (thus forgetting completely about roaming user profiles) and reboot. From the Windows description of this option: “This setting determines if roaming user profiles are available on a particular computer. By default, when roaming profile users log on to a computer, their roaming profile is copied down to the local computer. If they have already logged on to this computer in the past, the roaming profile is merged with the local profile. Similarly, when the user logs off this computer, the local copy of their profile, including any changes they have made, is merged with the server copy of their profile. Using the setting, you can prevent users configured to use roaming profiles from receiving their profile on a specific computer. If you enable this setting, the following occurs on the affected computer: At first logon, the user receives a new local profile, rather than the roaming profile. At logoff, changes are saved to the local profile. All subsequent logons use the local profile. If you disable this setting or do not configure it, the default behavior occurs, as indicated above. If you enable both the “Prevent Roaming Profile changes from propagating to the server” setting and the “Only allow local user profiles” setting, roaming profiles are disabled. Note: This setting only affects roaming profile users.”
Again, seasoned network administrators tend to favor option #2.
For comparison, here’s what an actual Windows Server will require for you to set up roaming profiles.
Note: Windows clients will expect the following permissions to exist for all roaming profile, regardless of whether a Windows or Samba server (thus our attempt to mimick with the chmod permission command).
| Windows User Account | Minimum permissions required |
|---|---|
| Creater/Owner | Full Control, Subfolders And Files Only |
| Administrator | None |
| Security group of users needing to put data on share | List Folder/Read Data, Create Folders/Append Data – This Folder Only |
| Everyone | No Permissions |
| Local System | Full Control, This Folder, Subfolders And Files |
| Windows User Account | Default Permissions | Minimum permissions required |
|---|---|---|
| Everyone | Full Control | No Permissions |
| Security group of users needing to put data on share | N/A | Full Control |
| Windows User Account | Default Permissions | Minimum permissions required |
|---|---|---|
| %Username% | Full Control, Owner Of Folder | Full Control, Owner Of Folder |
| Local System | Full Control | Full Control |
| Administrators | No Permissions | No Permissions |
| Everyone | No Permissions | No Permissions |
Samba Security
Microsoft Windows does not store or transmit passwords in clear text. Instead, it uses a hash of the user’s password for authentication. A hash is essentially an algorithm where a piece of data (the password) is transformed by a mathematical formula (the hashing algorithm). Microsoft Windows implements three of these algorithms:
- LAN Manager (”LM”, “LAN MAN”) (least secure, most compatible). Generated by splitting the password into two 7-character uppercase strings, and then converting each to a 56-bit DES key which both then encrypt the string”KGS!@#$%” (minus quotes) and concatenating the results.
- NT LAN Manager Version 2 (”NTLMv2″) (most secure and least compatible).
Although Windows NT & higher don’t use the first algorithm (LM) anymore, for backwards compatibility they locally store these insecure password hashes in addition to the secure version. It’s worth noting that since both the LMHash and the NTLM Hash are stored, the weaker of the two hashes becomes the weakest link. Therefore, the weakest link becomes the most optimal password (as anything stronger will be reduced in strength). Even the most complex password is therefore reduced to the effectiveness offered by a simple 7-digit single-case password. As a result, if your network does not include any Windows 9x/ME machines, you are strongly recommended to disable LM authentication on the Samba server and increase the minimum protocol by using the following global configuration in your smb.conf file. Note that this only addresses the password issues on the server, not anything stored locally on the clients.
lanman auth = no
lm announce = no
min protocol = NT1
TCP/IP Filtering
First off, don’t run Samba on an unsecured, publicly-accessible Internet connection. It’s just asking for trouble. We can, of course, lock it down a bit:
# Allow these IP Addresses to connect
hosts allow = 192.168.0.0/16 127.0.0.1
# Anything else not allowed is, by default, rejected
hosts deny = ALL
# If your machine has more than one Internet address, you can restrict
# the subnets which Samba will listen to.
interfaces = 192.168.0.0/24 127.0.0.1
bind interfaces only = Yes
As an additional layer of security,ou can also filter out (or in, depending on your philosophy) traffic using iptables with something like:
# Allow access to Samba from a particular subnet
iptables -A INPUT -p icmp -s 192.168.0.0/16 -j ACCEPT
iptables -A INPUT -p udp -s 192.168.0.0/16 –dport 137:138 -j ACCEPT
iptables -A INPUT -p tcp -s 192.168.0.0/16 -m multiport –dports 139,445 -j ACCEPT
# Log all unauthorized access attempts...
iptables -A INPUT -p udp –dport 137:138 -m limit -j LOG
iptables -A INPUT -p tcp -m multiport –dports 139,445 -m limit -j LOG
# ...and then reject the unauthorized access attempts
iptables -A INPUT -p udp –dport 137:138 -j REJECT –reject-with icmp-port-unreachable
iptables -A INPUT -p tcp -m multiport –dports 139,445 -j REJECT –reject-with tcp-reset
SSL Encryption
For better or worse, SSL support has gone the way of the dodo and has been removed from Samba as of version 3. The general consensus among the Samba team was that an SSL-enabled Samba could be better implemented by external tools. Add to that a batch of unmaintained and (mostly) unused code led to the final decision of the removal of SSL from Samba. The actual post that talks about the demise of SSL Encryption (May 2002) states:
This message is a warning: –with-ssl will die.
Ok, thats enough with the dramatics, but the general consensus amoungst the samba team is that –with-ssl really isn’t a particulary smart idea, and it is better implemented by external tools. So what is –with-ssl exactly? And why kill it? –with-ssl allows Samba to tunnel SMB inside an SSL connection. Unfortunately there are only 2 clients: smbclient and sharity. Windows clients simply don’t know how to use SSL. So why kill it? It might be useful to somebody? While some small minority of users might find it handy, it confuses many more including a surprising number of our distributors. Users actually using this functionality will find that they can achieve almost the same effect by creative use of ’stunnel’ both as an inetd wrapper as as a ‘LIBSMB_PROG’ program. Finally, it is intrusive and ugly, with large #ifdef sections in what should be simple code.
SSH Encryption
Why anyone would want to do this given the latency issues of running SMB/CIFS services over a WAN is somewhat beyond my comprehension. One method of encrypting SMB traffic over a network is to “tunnel” SMB through SSH using a method known as port forwarding. This is a frequently asked question by system administrators wishing to secure remote SMB traffic. While this is possible, it does have some serious drawbacks which we will touch on as well. It’s important to be aware that running SMB by itself without SSH over a 56k dial-up line is still terribly slow to the point of frustration. If you don’t have a high speed link or at least a lot of patience, you probably don’t even want to deal with tunneling over SSH. The other unfortunate bit of news is that due to a design limitation in the GUI API of Windows 9x/ME, you’ll only be able to perform your tunneled work in a MS-DOS window. Once you step outside of this and attempt to interact with your remote server via the GUI, you’ll find 30-60 second periods where the computer will pause/hang, after which it will complain that the path is invalid or unavailable. One possible explanation is the 16/32-bit nature of this type of Windows OS, however there has yet to be a confirmation of this by either Microsoft or the Samba team. Those using the 32-bit Windows systems will not have this limitation whatsoever. That being said, the good news is that tunneling SMB through SSH is indeed possible. Name services, or anything relying on UDP, can’t be forwarded via SSH due to a limitation in how SSH forwards ports (TCP only). So, we’ll focus on port forwarding only TCP/port 139. Since UDP tunneling is not available under SSH, your first step involves adjusting the lack of WINS/broadcast name resolution.
Windows provides two different files, HOSTS and LMHOSTS. The former is for Hostname-to-IP Address resolution (similar to DNS), and the latter is for NetBIOS-name-to-IP Address resolution (similar to WINS). LMHOSTS originally stood for “LAN Manager”. These files are provided as a “backup” in the case that DNS or WINS are not available. Since NetBIOS name resolution only works via UDP, which can’t be tunneled via SSH, the first step is to edit the LMHOSTS file:
REM This is c:\windows\system32\drivers\etc\LMHOSTS
127.0.0.1	FAKENAME	#PRE
Where FAKENAME is a bogus NetBIOS name that you will use to refer to your Samba server. The #PRE statement tells Windows that this name should be cached into memory, otherwise it won’t always be read. The LMHOSTS file will not be processed by Windows until you reboot or you issue the following command, which forces a reload of the NetBIOS name cache (note the uppercase-R):
NBTSTAT -R
Configure your client’s SSH program to forward port 139/TCP on the localhost to port 139/TCP on the server, and then connect via SSH. Once done, open up a Command Prompt and issue these commands:
NET VIEW \\127.0.0.1
NET VIEW \\FAKENAME
Viola! Both commands work, and you can confirm the encryption with a packet filter.
Samba Performance & Optimization
Samba can be tuned to be slightly more responsive in certain situations. At your disposal are several configuration options.
Socket Options
One useful parameter to play with is the sockets option setting in your Samba configuration file. However, it’s worth noting that since each network is different (wiring, switches, noise, etc), there is no “magic formula” that works for everyone. As a result, if you want to fine-tune Samba’s performance for your specific network, you’ll have to do some experimenting. For the diehard (and for a great insomnia cure), you can read up on sockets via the manpage for socket(7). Another three parameters to consider adding to are SO_KEEPALIVE, SO_RCVBUF=8192, and SO_SNDBUF=8192.
The last two options define the maximum size of the send and receive buffers for Samba. Smaller buffers means more fragmented packets; larger buffers (up to a point) mean less fragmentation. A good way to determine what’s best for you is to create both a single 100 MB dummy file and 100 multiple 1 MB dummy files and test the time involved in sending/receiving both sets of files to and from the server. You’ll want to make sure to stop and restart Samba each time to prevent any memory caching, just in case. By charting out the different response times for SO_RCVBUF and SO_SNDBUF you can find the optimal value for your specific network. To create a single 100 MB test file, you could use something like:
$ dd if=/dev/zero of=testfile count=10240 bs=10240
To create 100 multiple 1 MB test files, you could use:
#!/bin/sh
for ((counter=1; counter<=100; counter++)); do
	dd if=/dev/zero of=test${counter} count=1024 bs=1024
done
After you’ve gathered your data, you’ll want to chart it to find the optimal values for your specific setting. Once done, you can adjust your configuration file’s socket parameter to the optimal settings for your network.
Opportunistic Locking (oplocks)
How do you get to Carnegie Hall? Practice, practic, practice. What’s not mentioned in this classic line is how one must practice. Everyone has a different method or approach, which is perhaps why music is more of an artistic endeavor. In a way, that’s all opportunistic locking is — one method out of many possible ways of doing something (in this case, accessing files on a network). Granted, it’s all the current rage and is sought after as if it were the Holy Grail of all things that can be tweaked. Therein lies the catch: It’s just the flavor of the era; it has its advantages, and possibly some nasty disadvantages (read: Microsoft Access databases).
The actual definition of opportunistic locking is perhaps best described by an old Microsoft Knowledge Base article 129202:
With Exclusive Oplock, if a file is opened in a non-exclusive (deny none) mode, the redirector requests an opportunistic lock of the entire file. As long as no other process has the file open, the server will grant this oplock, giving the redirector exclusive access to the specified file. This will allow the redirector to perform read-ahead, write-behind, and lock caching, as long as no other process tries to open the file.
When a second process attempts to open the file, the original owner will be asked to Break Oplock or Break to Level II Oplock. At that point, the redirector must invalidate cached data, flush writes and locks, and release the oplock, or close the file.
Opportunistic Locking level II provides a method for granting read access to a file by more than one workstation, and these workstations can cache read data locally (read-ahead). As long as no station writes to the file, multiple stations can have the file open with level II oplock.
An illustration of how level II oplocks work:
- Station 1 opens the file, requesting oplock.
- Since no other station has the file open, the server grants station 1 exclusive oplock.
- Station 2 opens the file, requesting oplock.
- Since station 1 has not yet written to the file, the server asks station 1 to Break to Level II Oplock.
- Station 1 complies by flushing locally buffered lock information to the server.
- Station 1 informs the server that it has Broken to Level II Oplock (alternatively, station 1 could have closed the file).
- The server responds to station 2’s open request, granting it level II oplock. Other stations can likewise open the file and obtain level II oplock.
- Station 2 (or any station that has the file open) sends a write request SMB. The server returns the write response.
- The server asks all stations that have the file open to Break to None, meaning no station holds any oplock on the file. Because the workstations can have no cached writes or locks at this point, they need not respond to the break-to-none advisory; all they need do is invalidate locally cashed read-ahead data.
What’s worth mentioning are these additional gems of wisdom, summarized from the remainder of the article:
- Opportunistic locking should be disabled only to isolate problems.
- Oplocks are a significant performance enhancement, but have the potential to cause lost cached data on some networks, particularly wide-area networks.
- Disable raw and opportunistic locks when network throughput is low.
- Disable raw I/O and opportunistic locking when network delays are long.
- Decreasing the amout of time to wait for a client to respond before breaking an oplock can allow detection of crashed clients but can potentially cause a loss of cached data.
Level1 Oplocks: This is just another fancy way of saying “opportunistic locking” (see above). The client is allowed to download and cache the file on their hard drive while making changes; if a second client wants to access the file, the first client receives a break and must sync the file back to the server. This can give significant performance gains in some cases; in others, some programs insist on syncing back the contents of the entire file for a single change.
Level2 Oplocks is just a fancy way of saying that you are providing opportunistic locking for a file that will be treated as “read-only”. Typically this is used on files that are read-only or on files that the client has no intention to write to (at least, not initially).
Kernel Oplocks are essentially a method that allows the Linux kernel to co-exist with Samba’s oplocked files, although this is simplifying things a bit. SGI IRIX and Linux are the only two UNIX’s that are oplock aware at the moment.
Unless your system supports kernel oplocks, you should disable oplocks if you are accessing the same files from both Unix/Linux and Smb clients. Regardless, oplocks should always be disabled if you are sharing a database file (e.g., Microsoft Access) between multiple clients, as any break the first client receives will result in the entire file needing to be sync’d (not just the single record), which will result in a noticeable performance delay and, more likely, problems accessing the database in the first place. Notably, Microsoft Outlook’s personal folders (*.pst) react very badly to oplocks. If in doubt, disable oplocks and tune your system from that point. If client-side caching is desirable and reliable on your network, you will benefit from turning on oplocks. If your network is slow and/or unreliable, or you are sharing your files among other file sharing mechanisms (e.g., NFS) or across a WAN, or multiple people will be accessing the same files frequently, you probably will not benefit from the overhead of your client sending oplock breaks and will instead want to disable oplocks for the share. Another factor to consider is the perceived performance of file access. If oplocks provide no measurable speed benefit on your network, it might not be worth the hassle of dealing with them. Alternately, you could disable oplocks on a per-file basis within the share with something like, “veto oplock files = /*.mdb/*.MDB/”. If you’re having problems with oplocks as evidenced by Samba’s log entries, you may want to play it safe and disable both oplocks and level2oplocks.
You can disable oplocks on a per-share basis with the following:
oplocks = False
level2oplocks = False
Alternately, you could disable oplocks on a per-file basis within the share:
veto oplock files = /*.mdb/*.MDB/
Epilogue
These two sentiments are, perhaps, the most fitting way to sum up the experiences of working with Samba and Windows.
“What’s fundamentally wrong is that nobody ever had any taste when they did it. Microsoft has been very much into making the user interface look good, but internally it’s just a complete mess. And even people who program for Microsoft and who have had years of experience, just don’t know how it works internally. Worse, nobody dares change it. Nobody dares to fix bugs because it’s such a mess that fixing one bug might just break a hundred programs that depend on that bug. And Microsoft isn’t interested in anyone fixing bugs—they’re interested in making money. They don’t have anybody who takes pride in Windows 95 as an operating system.
“People inside Microsoft know it’s a bad operating system and they still continue obviously working on it because they want to get the next version out because they want to have all these new features to sell more copies of the system.
“The problem with that is that over time, when you have this kind of approach, and because nobody understands it, because nobody REALLY fixes bugs (other than when they’re really obvious), the end result is really messy. You can’t trust it because under certain circumstances it just spontaneously reboots or just halts in the middle of something that shouldn’t be strange. Normally it works fine and then once in a blue moon for some completely unknown reason, it’s dead, and nobody knows why. Not Microsoft, not the experienced user and certainly not the completely clueless user who probably sits there shivering thinking ‘What did I do wrong?’ when they didn’t do anything wrong at all.
“That’s what’s really irritating to me.”
“We prefer plain dealings and straightforward transactions in America. If you go to Egypt and, say, take a taxi somewhere, you become a part of the taxi driver’s life; he refuses to take your money because it would demean your friendship, he follows you around town, and weeps hot tears when you get in some other guy’s taxi. You end up meeting his kids at some point and have to devote all sorts of ingenuity to finding some way to compensate him without insulting his honor. It is exhausing. Sometimes you just want a simple Manhattan-style taxi ride. But in order to have an American-style setup, where you can just go out and hail a taxi and be on your way, there must exist a whole hidden apparatus of medallions, inspectors, commissions, and so forth — which is fine as long as taxis are cheap and you can always get one. When the system fails to work in some way, it is mysterious and infuriating and turns otherwise reasonable people into conspiracy theorists. But when the Egyptian system breaks down, it breaks down transparently. You can’t get a taxi, but your driver’s nephew will show up, on foot, to explain the problem and apologize.
“Microsoft and Apple do things the Manhattan way, with vast complexity hidden behind a wall of interface. Linux does things the Egypt way, with vast complexity strewn about all over the landscape.”
Neal Stephenson, In the Beginning… Was the Command Line